It’s all very well reading the manuals about growing food hydroponically and browsing the hydroponic supplies catalogues and websites but it can be quite difficult to get a medium sized hydroponics system set up from scratch. My own system was set up four years ago and whilst there are various tweaks and improvements I would make, it does work pretty well. So I thought I would share some of my experiences and views on the hydroponics equipment I needed to build my own hydroponic drip system. Part 1 covers mainly the nutrient delivery system and Part 2 covers building the grow channels.
Nutrient stock solution storage in water butts
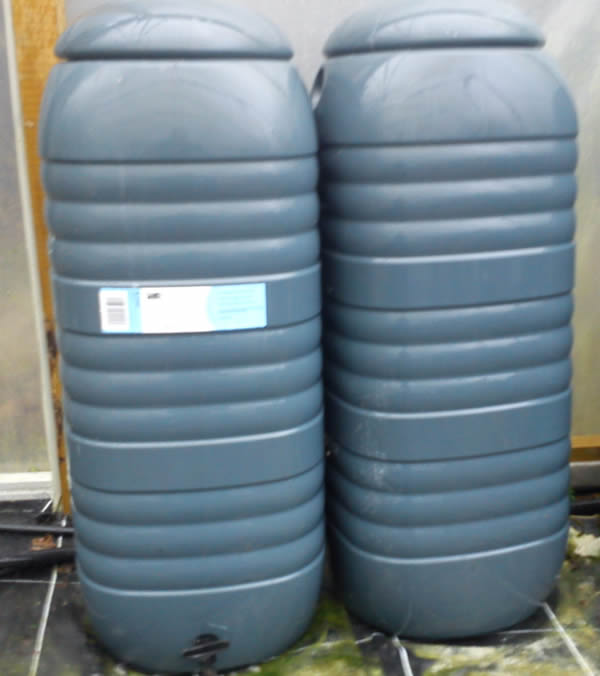
Nutrient Stock Solution Storage
The first thing I needed was somewhere to store nutrient stock solution that are made up. I use two stock solutions – Stock A and Stock B – which are made up at 100 x strength. To make up 100 litres of nutrient solution, take a litre from each of the stock solutions and mix it with 98 litres of water. I also add a small amount of acid (about 12 ml) to get it to the right pH level. Anyway I used two Sankey Slim Space Saver Water Butts with 100 litre (22 gallons) capacity. They have a plastic tap at the bottom but since the stock solution is scooped from the top with a measuring jug it doesn’t really matter. A tap outlet would help if you invested in an automatic system for mixing stock solutions – something I’ve never bothered to do. This photo was taken in the winter (March 2013) and you can see a little bit of green algae on the floor. When I do my spring clean of the system in the next few weeks that needs to be got rid of; a 10% beach solution should do it.
Nutrient storage in water butts
Nutrient storage in water butts
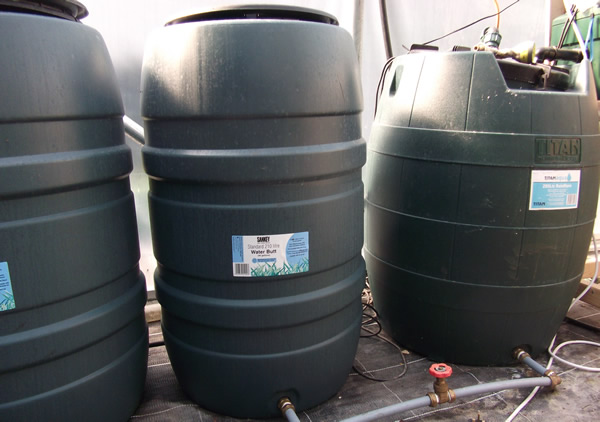
Nutrient solution storage is one of the next things you need. This is where the made-up solution is stored ready for supply to the plants. I started with a Titan Aqua 280 litre water butt, which was the largest available locally. At the time I thought that bigger was better. When the system was expanded there was a special offer on Sankey Standard 210 litre water butts (about 46 gallons). They were £25 each so four of these were purchased. If setting up the system today I would definitely have five of the same water butt and probably go for the best value one around 200-220 litres. Larger nutrient storage tanks are available online but they start to be very difficult to move unless completely empty and as a one man operation the 210 litre water butts give me flexibility. The water butts should all have covers so that no light or dust gets into the solution.
Why does the system need over 1,000 litres of stored nutrient you may ask? Well in full swing, hot weather with mature plants, about 100-150 litres of nutrient a day is required. So if we go away for a week’s holiday the system can be left to run by itself even if the weather is at heatwave levels; that’s about 27 degrees Centigrade round here.
I have a closed hydroponic system where the unused nutrient is recycled for further use. The alternative would be an open system, which I am not keen on for environmental reasons, where the nutrient is allowed to flow to waste. More on nutrient and closed hydroponic systems later.
The nutrient tanks are connected together with 22mm plastic pipe. Gatevalves can be used to isolate each individual tank (with the red top in the photo). This means that a single tank can be emptied and removed from the system for cleaning without affecting the others. With a closed system it is useful to periodically remove the re-cycled nutrient and replace it with fresh; otherwise salts build up to excessive levels. I let the level in the Titan Aqua butt get down to about 50 litres and then I drain it to use, diluted, on garden plants.

Growell 25mm Professional Irrigation Pump
Nutrient Pumps
Within the Titan Aqua water butt I have two Growell 25mm pumps, which are rated to each push out about 7,000 litres an hour. I use two pumps as there are two separate nutrient irrigation areas in the poly-tunnel. You may actually be able to get away with one irrigation line throughout the system but it’s nice to have the back up of a second pump; without the pump the system just does not work at all. The good news is that these pumps are now in their fourth season having cost about £60 /each. I did have a problem when I first bought them as one had a cracked case which meant that it didn’t pump at all. However this was quickly exchanged with no quibbles and all has been well since then.
An observation about pumps: I am really pleased with the performance and reliability of these pumps but I am now very careful when choosing a pump. Some of the irrigation lines run overhead and that involves pumping nutrient solutions 2 metres above ground. Where you are pumping water uphill, the capacity of some pumps will reduce dramatically and in some cases they will not pump the water at all (see later when I talk about my sump pump problems). So when a pump is said to produce 7,000 litres an hour that is straight from the pump outlet. If you connect a smaller pipe or are pumping the water to a higher point then the flow rate will be reduced; so look at the performance data produced by the manufacturer.
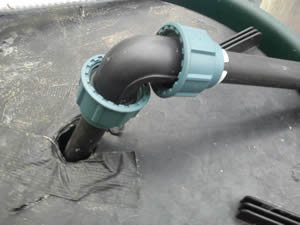
Nutrient pump outlet from top of water butt showing 25mm ZPE piping and connectors
25mm ZPE piping
The pumps distribute the nutrient through the irrigation system using 25mm ZPE piping. This is flexible piping in which it is easy to punch holes, with a special 4mm hole punch, to insert drippers. It comes in large rolls or can be purchased by the metre at around £1.25 per metre. The 25mm ZPE piping is joined using 25mm platic compression fittings which are quite easy to fit and cost about £4 each.
For my system I used about 8- metres of ZPE piping and around 25 connectors of different sorts : 90 degree elbows, T’s and end caps. I also used a few inline taps to allow bits of the system to be isolated and flushed.

300w Hydor Theo Water Heater
Water heater
Also in the Titan Aqua water butt is a 300W Hydro Theo water heater to keep the nutrient solution around 25 degrees centigrade. Whilst the poly-tunnel is not heated and can fall to a few degrees centigrade overnight, having the nutrient solution at a higher temperature helps a little. It tends to be the roots that benefit from higher temperatures.
Timer Control for Nutrient Pumps And Sump Pumps
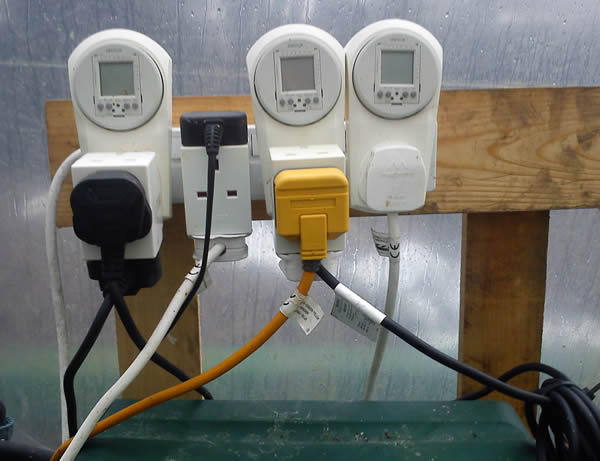
Timer Control For Nutrient Pump and Sump Pumps
The nutrient irrigation system is switched on 10 times per day for between 1 and 3 minutes per cycle. The cycle time depends on the needs of the plants at that time. 24 hour Grasslin Digital Timer are used to switch on and off the pumps. The Grasslin Digital timers are not cheap at about £20 each but they are reliable. Like all timers they need to be powered with mains electricity to keep the programmed timer settings. I have tried other timers from DIY stores which are nearer to £5 in price but I have had bad experiences with these as they have been unreliable. When you are leaving your system for a week without supervision then you need a timer you can depend on. For me the nutrient pumps and the timers are the key working parts of the system so you need to be able to trust they will work every day. I tend to change the timer settings about once a month as demands vary.
The photo above shows three timers which control:
- the two nutrient pumps
- a sump pump to recycle the nutrient from part of the system
- a sump pump to recycle nutrient from the other part of the system>
Also shown are:
- plugs for the nutrient solution heater which is left on all the time as it has its own thermostat for control
- pond filter uv light used to recycle nutrient back into the storage tanks
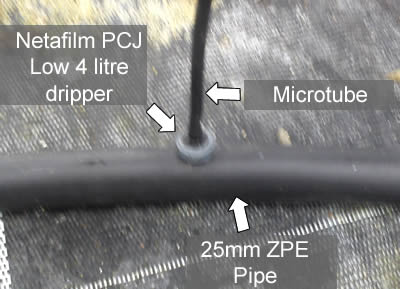
ZPE piping and dripper
Irrigation supply and hydroponic drippers
The ZPE pipe is layed out round the poly-tunnel next to the grow channel holding the plants.
I bought pre-assembled dripper sets which consisted of:
- a Netafilm PCJ low pressure 4 litre/hour dripper
- 80cm of microtube
- a Prevo black stake
The dripper has a barb on it which is pushed into a hole in the ZPE pipe made with a 4mm hole punch. The microtube is pushed over the nipple on the dripper and then the Prevo stake is attached to the other end of the microtube. The stake is then pushed into the growing media where required.
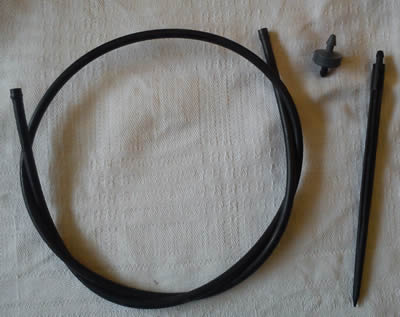
Hydroponic dripper sets – dripper, microtube and stake
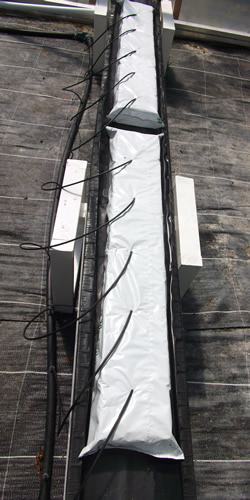
Grow channel and ZPE pipe arrangement for hydroponic drip system
The photo here show the ZPE pipe with the drippers pushed into Grodan rockwool slabs ready to be filled with nutrient. The rockwool slabs are sitting on the grow channel.
In Part 2 of Hydroponics Equipment Needed To Set Up A Hydroponic Drip System we will look at the equipment needed for setting up the hydroponic grow channel.
You have a great website which is very informative. I am doing research for a commercial hydroponic greenhouse that I would like to set up. It will be about 2000 sq. meters, making it a pretty serious endeavor, as a result I am trying to get as much information as possible before making an investment. I am torn between using coco-fiber filled troughs vs. coco fiber slabs in my production. Using a slab system seems cheaper since we will be able to use drip lines vs. individual drippers that you discuss here. However I have been told that the risk of contamination is much greater in troughs than in slabs due to the fact that the in the troughs the substrate is not separated and therefore can contaminate healthy plants with root disease from if one develops somewhere in the trough. What is your experience? Is this a problem that you are aware of or is this something that is not a serious issuer and/or can be managed. Thanks you very much. – Andrew Shatalin
Hi,
Great article, I’m just wondering where abouts part 2 is? Is there a list of literature that you used in helping with this article as I have a manual to write on Hydroponics equipment.
Hi Charlie
There is a link in the text but you can also find it here.
great article mate, some great stuff
Come the spring, I’m going to see about setting up a system like this for my food garden. Knowing what materials to have in order to create the system is good to know as I wouldn’t want to be running around without any idea. I’ll make sure to get everything that you have listed here so that I can start building it.